Friday, November 9, 2012

Mama C's French Toast Casserole

French Toast Casserole

There is always a fantastic story behind most dishes and recipes I re-create or make for my family.  This one in particular, reminds me of a very sweet, caring mother of a dear friend I met about twelve years ago.  I grew up in church most of my life, and had just started attending my home church again.  There were some familiar faces and some new faces.  I, am quite shy, truth be told, so I naturally tend to stay to myself, until I become comfortable around others.  Of the new faces was this young lady named H, we instantly hit it off.  It was almost as if we had known each other our whole lives, or so that's how I remember it.  Now her mom, Mama C, was a mean cook!  Honestly do not think she            E. V. E. R cooked anything bad. No seriously, she was THAT good!  I would constantly beg her to fix my favorite dishes at all Church functions.  Y'all know church folk LOVE to eat, and I LOVED to eat her food. ;-)   

So what is the story behind this recipe you ask?  Well This is Mama C's recipe!  Now that I have moved away from my hometown, every single time I make this delicious dish, I am reminded of her humor, her laugh, and her "girl please!" phrase!  Love and miss you both!!

 This recipe is a classic, simple Sunday Morning recipe that just fills your belly with goodness. Warning, no calories were spared in the making of this scrumptious dish. 


What you will need:

(9x13 pan, mixing bowl and brown sugar not shown)
  • 1 stick of butter (1/2 cup)
  • 1 cup Brown Sugar
  • 1 tsp cinnamon
  • 1 tsp pure vanilla
  • 12 slices of bread
  • 5 eggs
  • 1 1/2 cup of milk
  • 9x13 pan
  • large mixing bowl


Method to the Madness:

Melt butter in sauce pan, stir in brown sugar, cinnamon and vanilla.

Pour  half of mixture into the bottom of your 9 x 13 dish.


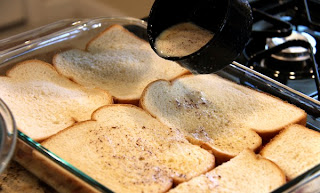
Place bread in a double layer on top of the brown sugar/butter mixture.  Next pour the remaining mixture on top of the second layer.

(Please ignore the fact that the brown sugar/butter mixture isn't in the bottom of the pan :-) )


Beat eggs and Milk in a large bowl


Then pour the Egg/milk mixture over the bread


Refrigerate overnight so the bread can absorb all the yummy goodness.
Bake uncovered at 350ºF for 30-45 minutes depending on your oven.

Serve with warm syrup and powdered sugar.


Note:  The recipe allows you to substitute or add too at your discretion.  I have used breakfast bread with raisins and cinnamon swirl or cranberries and walnuts and it was just as delicious as the simple version.  The possibilities are endless.


Hope you enjoy cooking as much as I do, and living life, homemade.
~Laura


Thursday, July 5, 2012

Encouragement for Potty Training Mamas


Potty Training Late Bloomers:


First of all, I just want to take a moment and give a little shout out to my son, Jeremiah!  He has been completely potty trained since our "poop on the floor" incident.  For those of you are not my facebook friends, this was the day where he decided he wanted to act like a dog.  So, he preceded to poop on the floor as a dog would.  Props for him noticing how animals do the "deed", but nonetheless!!!   As if that couldn't have been a test of pure patience for the typical stay at home mom, my daughter (Adrielle who is 22 months now) was the one to break the news gently.  She brought me the poop.  Disgusting I know!   God was testing my patience that day for sure!!   I cleaned up the poop, and cleaned up his rear, then stepped inside my room and just began to cry.  I was so upset and mad at him for doing that, knowing that he knew better!  I took about five minutes to 'cool' off my temper before I handled the situation.  I gathered my thoughts and went into his room.  I gave him my mom speech and then collected all his toys, train table, TV, DVD player, etc and took it out of his room.  He was left with a bed, a dresser and clothes.  This mama was not playing.

However, since that day, the concept finally clicked and he is officially potty trained.  I could not be more proud of him!!!! 


He even goes completely by himself and only calls me when its time to wipe.   Also let me just say one thing:  Several other moms have made comments about him being so much older (he is 3.5) , and theirs learned much earlier...etc.... and please allow me to defend my reasoning for waiting to "press" the issue of potty training:

1.  All children ARE DIFFERENT.  I didn't want to force him into anything that was going to become a BIG ordeal and hassle in his eyes.  It was his decision to start not mine.

2.  Jeremiah briefly attended a daycare with other children who were potty trained but not long enough for him to take notice: FACT: Most children who learn how to potty learn from older siblings or other children in a daycare setting.  My son had neither.

3. When most moms "typically" start potty training...around 18 months or so, I was 5 months pregnant with Adrielle and on BED-REST.  The LIFE and HEALTH of my baby girl and mine, was MUCH more important than to stress the issue of potty training before she arrived.

4. Once Adrielle arrived, I felt that the extra attention that I was having to give to her over Jeremiah would cause him to revert back to diapers and pull ups anyways, and I just didn't want him to freak out and have to stress over these things.  He was already in a new environment/home, he had a baby sister, things were just too crazy for him not to mention he was extremely jealous, and I didn't want to stress him out over something like that.  

5.  Slowly he became interested in peeing like his daddy or his papa as he would say, so we started the training process.  By this time he was already 3.  From then on he was doing fantastic, just not totally engaged in the "poop" training.

6. Our BIG move. To move from house to house is in itself a transformation, especially for young children,  but we moved to a different state! Away from family, away from friends, away from everything that was comfortable to him.  The whole packing process, moving, etc totally got his nerves shot out and he would revert back to potty'ing' on himself. Finally once we settled in at our new home, and we all began to encourage him more, he began to pick up very fast! The rest just fell into place.  When he pooped the first time, we made a HUGE "whoop-to-do" and celebrated with money and ice-cream. now everything is second nature.

So in response to those comments of "my child was potty train SO much earlier"  I am not an expert on Parenting by any means, however, I know my child.  I chose to do what was best for him.  My concerns were not keeping up with the next mom on the block of having a 12- month old potty trained child!  Just my opinion. Just my child.  

Your child may be very different and express an interest early.  I congratulate you in advance!  However, if he/she isn't, don't fret.  It will be okay!


*just my little spill for today!*

Be Blessed!
~Laura

Friday, May 18, 2012

The "Easy" Way to Harvest Fresh Corn


Good Morning Everyone!!!  I am so sorry that I am late with this, but it literally has been raining and storming here since Monday...and is still raining, but as promised, I am delivering a "how-to" tutorial. Aren't you proud?!?! ;-)  Now to get right to the subject.... CORN.  I don't know about you all, but I absolutely love fresh corn, grilled to perfection with my homemade garlic butter.  Yum---mmmy!!  The only thing that I highly dislike is the cleaning and shucking process.  It literally drives me almost insane.  Literally.... I recently read an article on a fellow blogger's site, explaining how to get the husk off the corn without loosing your marbles....and for the life of me, I can not find it in order to link you to the original post! Tragic huh?  Nevertheless, I will continue with my own rendition of the process:


So, if you know me, then you know that I attempt to be a "savvy" grocery shopper.  And if any of you see me go into the store WITHOUT my coupon binder, please do me a favor and hit me in the head!  I promise I will not press any charges.  With that being said, I will continue.   In my previous post I mentioned going to a farmers market or a u-pick farm for your fresh fruits and vegetables. And I stick to my word.  Nine times out of ten, you will get the cheapest, freshest produce there.  Fortunately, Publix was having an awesome sale on sweet corn last week.  Ten (10) ears for three bucks ($3) is not bad at all.  That is only $.30/ear.  which is very reasonable and comparable to the local farmers market and fruit stands.  Knowing that the sale would end in a few hours, I bought quite a few ears of corn.  Our family can put away some corn, including the kids.  So here is the "how-to" properly clean, prepare and freeze corn. 

NOTE: (For other ways head over Here). I also read on a forum that older women place the corn (husks and all) in a brown paper bag, roll it up tight and place it in the freezer.  no vacuum required.  whenever you want an ear of corn you just go grab it out of the freezer.  I personally haven't tried this method, but I intend too, so I will update at a future date with that.  In the mean time, if you have please share your experience below. (-:  )

What you will need:
Ears of corn
Baking sheet
Vacuum sealer
Vacuum seal bags
Marker


First things first:  Pre-heat your oven to 350 degrees.

Next, Arrange the ears of corn in a single layer on a baking sheet with husks still attached.


Bake in the oven at 350 degrees for about 7-10 minutes.  Just long enough to get the ears warm.

During this time, get a pot of cold water ready.  To me this is a form of blanching, just different than boiling then throwing in cold water. (hope that makes sense) You will know they are ready once the tops of the ears get brittle and dry.  Once this happens pull them out of the oven.  

Start shucking the husks off the corn quickly.  You will find, that the heating process enables you to pull the husks off clean, without those aggravating corn silks.  Once shucked and clean place into the cold water.  This stops the cooking process and allows the corn to stay fresh once frozen.


 Finish shucking the corn as soon as possible.  rinsing with water, then placing in the cold water.  Once finished, place all the corn on a paper towel to allow the corn to air dry for about 2 minutes.  You do not want moisture on the corn or in the freezer bags once you seal them.  
Be sure to write the date and product on the contents portion of your vacuum bags.  Putting the date is important because usually corn stored in a vacuum seal package or container can last anywhere from 6 -12 months.  After twelve months, I would open the package and smell the produce.  You will be able to tell if there is any spoilage, trust me. ;-)  Once they have dried, place the corn in your vacuum seal bags.  

***I recently ordered some vacuum seal bags from Vac-N-Save Products 50 quart size bags for only $11.99.  This was a great deal considering, if you were to purchase the FoodSaver brand bags at a retailer such as Wal-Mart the price for only 20 bags is $8.99.  So, for less than the price that I paid (including shipping), I received 10 MORE bags.  ****


UPDATE: after several attempts to properly use this bag, I am sad to say that I have returned the bags for a refund.  The seal never held up as compared to the FoodSaver brand and I was just entirely displeased with the quality.

This is a quart size bag.


This is a Gallon size bag


After you arrange your corn in the bags, use your FoodSaver and vacuum and seal the packages. 
This is the one I received for Mother's Day ;-)

 
My FoodSaver


Seal the bags as instructed, according to your machine's owner manual.  After you have completed, this is what the finished product should look like:

Now you can enjoy the freshest pick of the crop, anytime of the year!  Enjoy!


Enjoy your life, living it homemade ;-)
~Laura~


Wednesday, May 16, 2012

Fresh is Simply the Best

There is nothing better than grilling out during the summer.  Must be a southern staple, but I have always enjoyed it.  I enjoy cooking in general, but that is just my nature.  And there is nothing better than cooking with the freshest fruits and veggies.  Although, that sometimes is more difficult than we may think.  Not to mention costly.  In efforts to keep grocery expenses down, it is always wise to buy during a vegetable and fruit's peak season.  Grocery store chains tend to hike up the price to make a little profit, in that case your best choice is to find as local farmer's market and purchase straight from the farmers OR grow yourself. When having your own garden isn't an option, the definitely go with the farmer's market or find "U-Pick" farms in your area.

Over this past weekend, my family and I all went to a local U-Pick Farm Cottle Strawberry Farms in Columbia, SC and picked our own strawberries.  I have to say, it was a TON of fun!  Usually, I am not the type to get out and do much gardening or outdoor activities due to allergies and such, but the older I get, the more I enjoy it.  Not to mention, my children LOVE being outdoors.  I shouldn't make them suffer for my allergic reaction to fresh cut grass. :-)  Anyways, back to the strawberry farm.  It was a blast.  You pick your own berries.  You can choose from a pint or a gallon.  We chose to get 3 gallons and my parents and I split it.   It was fun teaching the kids about the difference between good strawberries and the ones that were still "growing" and I know they enjoyed it too.

So the next time you are in the grocery store buying fruits and veggies, remember to check out your local farmers market, fruit stand, or a u-pick farm close to you. :-)  Healthier, cheaper, and secretly more fun!

 They loved picking the strawberries!
 She just would not let go of that bucket ;-)
I Think He may have ate, just as many as he put into the bucket, hehe!  


Stay tuned for a "how to freeze" tutorial coming later today!  And remember, Enjoy your life, Living it homemade!

~Laura

Tuesday, May 15, 2012

My Purpose in the Blog World

"The happiest people don't have the best of everything...They just make the best of everything they have."


When stumbling upon this quote, I just sat in awe!  I thought to myself, this is it!  this is going to be my new slogan!  Some people question my "frugalista" (yes my own word) ways, but this quote sums me up!  How I strive to live and provide the best possible for my family without taking away from our necessities.  God has blessed us with so much and I will try my best to never take that for granted.  What I do not have, I don't stress over, it is a lesson, that has taught me, and is still teaching me to make the best of everything and to teach my children to do the same thing.  Stuff is just that...STUFF, you cant take it with you when you die...and life is extremely too short to be focusing on it.... so why try to flaunt it and keep up with the Jones' per say.  just my opinion....

So, back to "My Purpose in the Blog World"....  Basically, it is quite simple.  I thoroughly enjoy learning new ways to save money and cut unnecessary cost in every day life.  I enjoy crafts and pretty much everything homemade.  That is when I decided to start this blog.  Since moving to Columbia, South Carolina (after being uprooted from my home town for 27 years) I haven't met but a handful of people, that is including neighbors and Daniel's (my hubby) co-workers.  With that being said, I have been starving for adult interaction and conversation.  Being a stay at home mother of two beautiful children under the age of 4 is the most rewarding Job I could have, but also very tiring and stressful at times... (aka potty training).  I would find myself updating my Facebook statuses just to vent or hear myself as I was speaking to an adult. Sad but true!  So for all my Facebook pals, I will no longer be flooding your news feed with my boring realizations and my venting rampages, even though I know you all enjoyed it, ;-) .

With that being said, Stay tuned for a "how-to" blog (at least) once a week and anything else I may feel the need to blog.  Most importantly: Enjoy your life, living it homemade ;-)

-Laura